Wednesday, August 24, 2016

The Other Big Project~(Vintage Trailer)

Mrs. Calabash?
Is that you?

Back here, I shared that we usually have a couple big projects
going at any one time.
The bricks still aren't finished, but they are getting closer.
The other "big project" has been to restore Mrs. Calabash.
You can see more about her here and here.
Once we got the necessities in order, we came to the point
where a decision needed to be made.
She needed to be re-sealed which involves removing all the windows, 
J-channel, eyebrows, trim, etc.
Did we want to go through all that just to have to do it again
in a year or two when we refurbished and painted her?
We chose to just do it all now.

We pulled Mr. LB's old project car out and tarped it.
Then Mrs. Calabash got the place of honor in the shop.

And we began the process. . .
At first it seemed like we just kept pulling her apart
and that nothing was being fixed,
which of course is part of the process.
Also at first, I was doing it myself, but it didn't take long for Mr. LB
to take pity and dig in too.
I started by removing the lower sections of skin (siding) 
to see what was under there.
Then, all the trim, windows, and J-channel came off.
I won't show every detail, but enough that hopefully 
you can see just what we've done.
From the first Aristocrat I saw, I was drawn to them.
I like their floor-plans and generous windows.
They do however, have a design flaw.
That bottom skirting board is exposed and sandwiches the paneling
so the water wicks right up and holds.
In researching ways to fix and prevent it from happening again,
I learned that deck sealants (and the sort) can react with the aluminum
so those were out.
The only thing that could possibly work was the black, smelly,
gooey, sticky, tar paint/sealer.
New skirting boards getting their icky coat of tar paint.
We had to take off more skin than I had initially thought,
up to the roof so everything could be "right."
More on that in a minute. 
One corner of interior paneling was damaged on the back passenger side corner
so I robbed the section from the front, behind the couch
leaving a nice big hole here.
Here's that minute, from a minute ago:)
At one point someone had tried to "fix" the bathroom corner
using incorrectly sized lumber and fencing staples!
so it had to come out in order to make it right.
At this point - right here - I almost cried.
She kept coming more and more apart.
Nothing was going back together yet.
This is the driver's side rear, and I couldn't make enough paneling for it,
so I did the next best thing.
We got white bead board and I antiqued it.
I was pleased with how well it turned out and how closely it matches.
(They had used a mauve and country blue floral el'cheapo paneling.)
I did the same with a piece of 1/4" plywood for the front 
where I robbed the real paneling.
Then finally, finally, finally, we got to start putting pieces back together
rather than tearing them apart.
You can see here, we also replaced several of the boards across the back that were not as sound as they could have been.
At this point, I actually went around her with the tar paint
and painted all the corners and any nook or cranny 
that I thought might be prone to moisture.
Also, the yellow batting that provided about as much insulation as a paper towel, was removed where we had to work but left where we didn't.
It really is that thin.
Over it or instead of it (depending upon where) we added rigid R5 insulation.
I can't even begin to express what a relief it was
to begin to see her starting to come back together.
Once all the insulation was in place, we began putting the skin back on.
That sounds easy enough, but getting it back on just right took time.
1/8 of an inch off in one spot can result in an inch off in another.
We were aware of this so made sure everything was right on as we worked.Luckily, that didn't go to terribly, though when we went to put the door back on, there was a bit of a bow in the wall as a result of having no additional support from doors or windows for the duration of the process.
Once we got the skin back on her, we got to sand and prepare for painting.
We were going to paint her ourselves.
My thought was that if someone else makes a run or does a sub-par job,
I would be pretty upset.
If I do it, I can only be mad at myself.
As it turns out, Mr. LB knows a fellow fisherman who does this for a living.
We talked about it and decided to let him paint her.
My comment was only, "Please let him know that this is advertising for his business - good or bad, it's up to him."
I think he told him something along the lines of, "This is my wife's baby, and I want to be able to walk again after it's painted."
Okay, not really, but he knows I want her done nicely.
I'm really not that mean (Well, most of the time.  Maybe don't ask my baby brother that question. :)
And here she is on her way to "the beauty parlor."
Sorry the picture is a little fuzzy.
This is about 5:30 AM, and it was barely light enough to get a picture.
We had to put the windows back in so that she could travel
the road to get her there.
We just put a half dozen screws in each and will pull them back out
in order to mask and paint.
She's on the docket to get the main body color Thursday,
then the accent color Friday.
Then, once she's back home, we'll get to seal her back up
with new putty-tape and all the trim, which I have been polishing
by hand all along in my spare time.



Thursday, August 18, 2016

Pullet Eggs and Antique Egg Scale

Finally!

The girls have been clucking like they have laid an egg,
but no eggs have actually been produced.
When I hear them,
I tell them they have to lay an egg to cluck like that.
So, one of them actually listened to me.
(I'm sure that's what it is.)

I've been checking for good measure.
And to my surprise, evening before last when I checked,
there was a treasure in the nest.

It's been a few years since I've had chickens,
and I missed them.
My friend Shirley used to love the pullet eggs.
She said they were just the right size.
Here you can see on my antique egg scale
that it doesn't even register as small.
Actually, it barely brings it up off the black line.
Yes, the scale works just fine.
It's another of those items that was built to last~ 
(like this and this)
If you have laying hens (or birds for that matter) 
you might keep your eye out for one.
I've only ever found one other.
It was the same as this one but completely rusted, and
I'm not sure if it worked.  Cost $45 = Not interested.
They are handy as the size of the eggs produced increases.

These hens have been "good girls" for the most part.
Though, I do have to remind them that chickens are not house pets.
They try to follow me in the house.
As have the lambs when they were younger.
What is it with these critters?
(Ignore mess please.  I was sorting piles to go to donation, also filled the garbage can you can see just out the door:)

We are certainly happy to be getting some "farm fresh" eggs again.
Now if the other 3 will just chip in and earn their keep,
we might be able to have breakfast.


Wednesday, August 10, 2016

Grain Free Cheesy Bread - Yum

Howdy Folks,
I just wanted to share a little recipe I have with ya'll.
If you have followed along here for some time,
you probably know we don't eat a lot of grains.
There are certain dishes though, that just need "something."
This cheesy bread recipe is easy and pretty darn tasty.
I can't take credit for it as it was shared with me by a friend
a few years back - Thanks Pam:)

We especially like it with sloppy joes or chili.
You can find the recipe for my sloppy joes way back yonder.
(We still ate bread back then.)

Any-hoo, here ya go. Bon Apatite!

Cheesy Bread

2 Tbl. butter - melted
1/4 cup sour cream
1/4 cup grated parmesan cheese
1 egg
1/2 cup shredded cheese (cheddar etc)
1/8 tsp. salt
1/2 cup almond flour
3 Tbl. coconut flour
1 tsp. baking powder

 Mix all ingredients together.

Form 2 "logs" and divide into 6 portions (3 each.)

Flatten each portion onto greased baking sheet.

Bake at 350* for about 15 min.

That's it.
And here I need to apologize.  It was getting late so we served up
and ate and I neglected to take a picture
so you could see how yummy looking it is topped with sloppy joes.


Sunday, August 7, 2016

Total Garden Decimation!

This is so difficult to even write.

Last Sunday, we were called out of town for the day.
It wasn't an emergency or anything bad, just circumstance.
We did as we have been doing for the past several weeks
as far as the lambs are concerned.
Needless to say, they got loose and found the garden while we were away.
It wasn't entirely their fault or ours.
It's just what happened.
I am guessing they got their heads into the tomato trellises
and from there the rodeo was on.
The bird bath was tipped over and is broken on one side.
We had been enjoying salads nearly every day.
The beans were just ready to pick.
And the tomatoes were just coming on strong.
The lettuce, kale, chard, spinach, beet tops, and carrot tops
have all been mown.
The beans are destroyed.
There are a few that we might be able to pick and eat for a meal,
but not enough to can.
I am hoping that maybe the beets and carrots will still grow.
I will admit I cried a little that night.
We both work away from home full time.
We have poured a lot of sweat and time into those four plots.
They might not be fancy or valuable to others,
but for us, it is a large part of our winter food supply.
To many, I'm sure I sound completely ridiculous.
Yes, we could just go to the store and buy food.
But our food is "real" food we believe in.
It doesn't support Monsanto, require astronomical amounts of fossil fuel to transport, or involve foreign slave labor, and it is as organic as can be.
We amend the soil each spring with the compost we have made
 from the previous year.
We believe in this food so much we are willing to sacrifice
evening and weekend hours of our lives tending it.
In addition, there is money lost - not a lot, but some.
The real money lost will be that spent at farmers market purchasing
the things that were growing right out our back door.
(Our farmers market doesn't even have one organic booth
 but is semi-local at least.)
It's really not about the money though.
It's about believing.
When you work hard towards something only to have it trampled upon,
it hurts.
I have no doubt others have stories far worse.
We are not in harms way, we have a house to shelter us, and
for all our blessings I am extremely grateful.
But I cannot lie in saying I can't wait for butcher day.

I did right the tomato trellises, and get the tomatoes upright.
I added composted chicken poo around their bases and watered it in
with a really good soak.
They didn't actually eat those so I will remain hopeful.
I also found some organic green bean seeds and planted those.
I don't know if they will have time to grow,
but I had to try.
I still believe in our real food.


We love these 3 cup jars, especially for things like green beans
that don't can as compact as things like corn or peas.
It's the perfect amount for the two of us. 

Monday, August 1, 2016

A Very Special Finish

After three + long years, I've finished it!
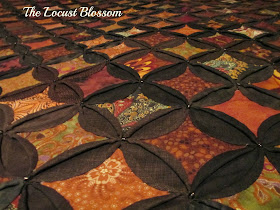
It's the Cathedral Window Coverlet I made for Mr. LB.
If you would like to see a bit of the progression,
you can look hereor hereor even here.
This was all stitched by hand.
The only machine used was an iron.
If you don't like to iron, don't even begin this project.
It began with origami of 398 blocks of fabric
being folded down to a 4.5 inch square and ironed in place.
That's before you even start stitching.
The other tip is, there are various instructions for this pattern.
Yes, you do need to stitch through all layers of fabric.
If you don't, you will have to go back and restitch every-other corner.
(Ask me how I know that one!)
Mr. LB liked the 3D look of the fabric folding 
so I purposely didn't go through all layers.
It was actually more difficult and caused a lot more work
on an already big project.
I also added a bead in each corner to give it a little more depth and interest.
So here is the finished product.
Please never-mind that the pillows don't match.
That's next.
I did find some fabric at the Baker City Quilt Show
for pillow cases to go with it.
They just aren't made yet:)
Here's what that looks like.
Sorry, it's a little dark.

The other tid-bit that makes this a special finish,
is that having taken so long,
I had shared the progress with my friend Shirley.
She meant the world to me and passed away in March of last year.
She didn't get out for more than the occasional doctor's appt.
in her last year or so.
She would always inquire about what I was working on.
I had taken this a couple of times to show her the progress.
She thought it was beautiful and made me promise to show it.
I promised I would, but not in a judged show.
It is not a show quilt.
Next month, it will be at the Walla Walla Quilt Festival
in order to honor that promise.
They say a picture is worth a thousand words.
If that is true,
I can't imagine that a hand-stitched quilt is worth any less than a million.
The events of life that unfolded while stitching this
will make it forever memorable.
That's something a "Quilt in a Day" can't offer.
(Note* I don't dislike "Quilt in a Day" quilts, but I do appreciate "slow" quilts.)